Install on Azure
This document is intended to guide users through the deployment of Medplum on Azure using Terraform. It provides detailed instructions and configurations necessary to set up essential components such as a Virtual Network (Vnet), Azure Kubernetes Services (AKS) cluster, PostgreSQL database, Storage accounts, CDN, and Redis instances. The purpose is to ensure a smooth and efficient deployment process tailored to Medplum’s specific requirements, facilitating scalability, security, and high availability within their cloud environment.
This deployment option has been validated for production use and offers a robust foundation for your implementation. However, it provides a less-automated setup and requires significant operational expertise.
This is a complex multi-step process, and requires high proficiency with Azure, Terraform, Node.js, and command line tools.
Medplum strives to make this as easy as possible, but despite our best efforts, it is still challenging.
If you have any questions, please contact us or join our Discord.
High-level overview
To deploy Medplum in Azure, the process is divided into two parts:
- Static Infrastructure (using terraform)
- Medplum App (helm chart)
This division allows a fully customizable deployment, for example: if a customer wants to use an existing K8s cluster, they can just deploy the helm chart to it.
The Medplum application is configured using a secret in Azure KeyVault.
See Generate Configuration Secret
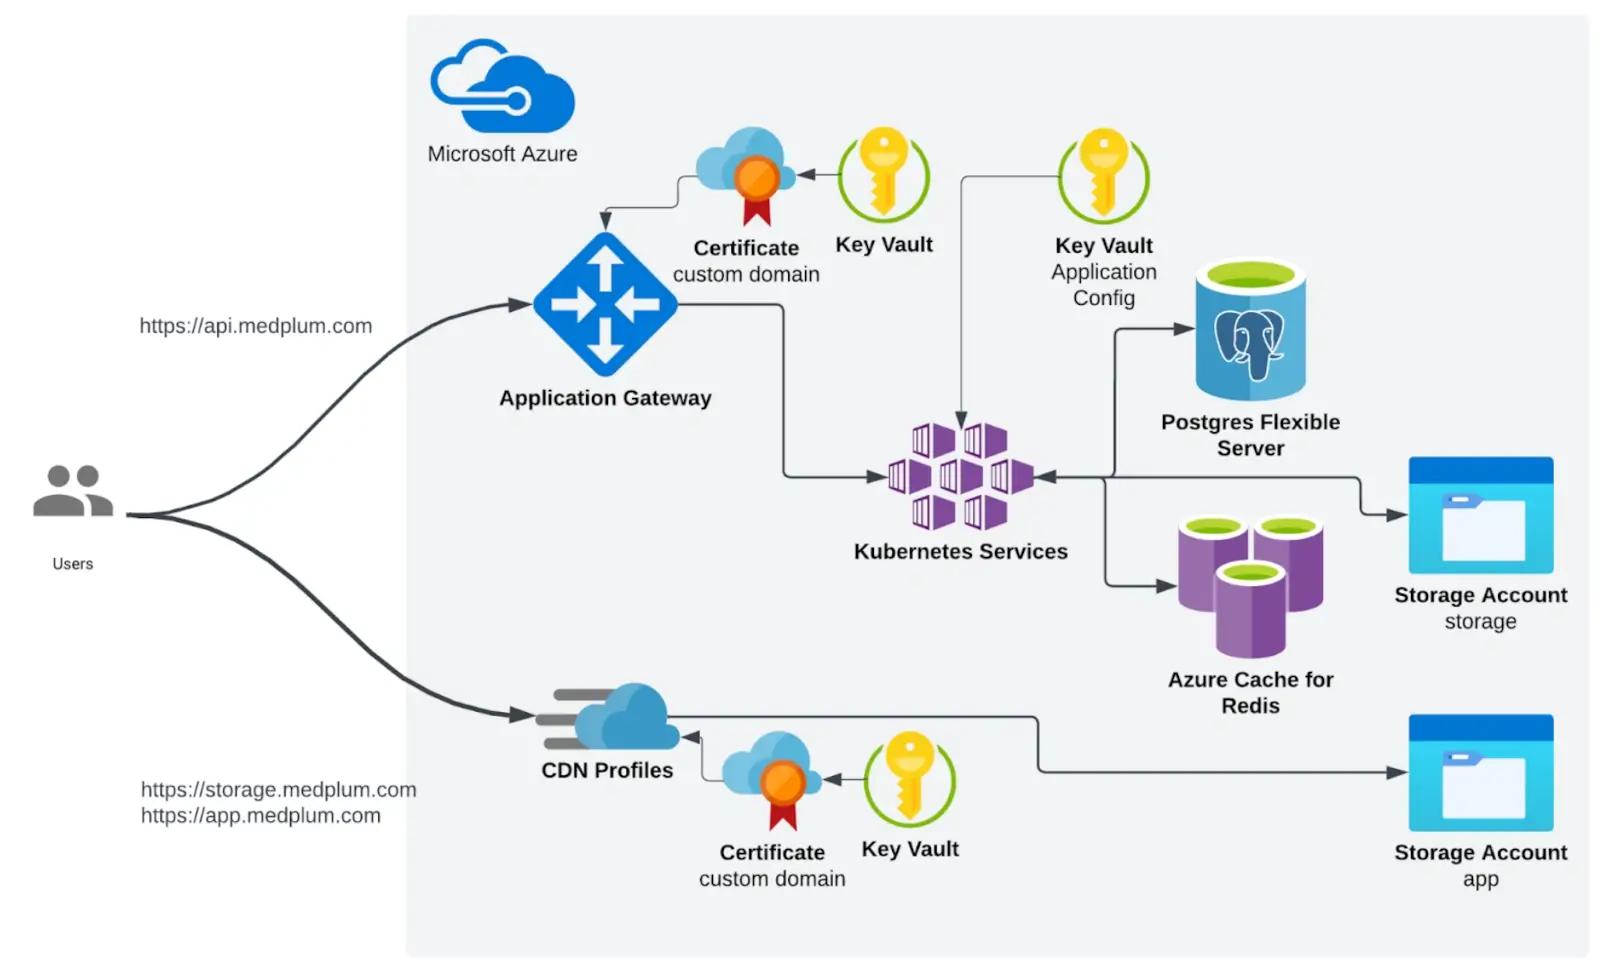
Azure Architecture

Infrastructure summary
- The Medplum backend (API) container runs in Kubernetes.
- The API is exposed using an Application Gateway, which is created in terraform
- Azure AppService managed certificates are used. (they need to be created and exported to a KeyVault)
- We use a managed Redis cache and PostgreSQL flexible servers
- CDN profiles are used to expose the frontend (app)
High-level deployment process
- Create a KeyVault for certificates. Generate the certificates and make them available in the KV.
- Deploy static infrastructure using terraform (VNET, AKS, PostgreSQL, Redis, Storage Accounts, Application Gateway)
- With the values from Step 2, create the Medplum app configuration
- With the values from Step 2, point the DNS records
- Deploy the backend application using the helm chart
- Copy the frontend files to the CDN storage, using the script
Azure Deployment
Prepare Certificates
You may choose another way of generating the certificates, ie: LetsEncrypt, but in this case, we have used all Azure services.
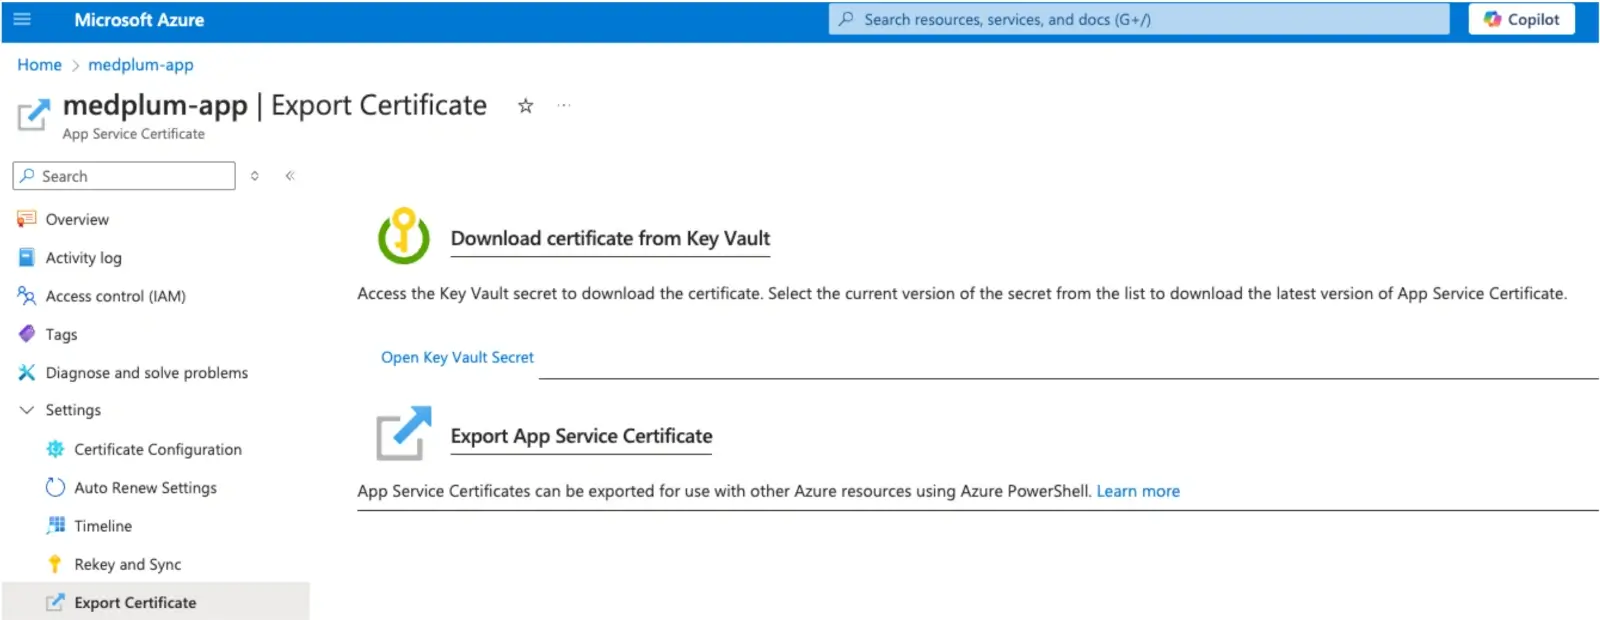
You can generate managed certificates using AppService:
After the validation, you can export the certificates to a KeyVault from the certificates UI in Azure.

This step is required before deploying the terraform code because the CDN requires the certificate to be generated for using custom domains.
Infrastructure Deployment
The terraform folder contains Terraform configurations for deploying infrastructure on Azure. The setup includes:
- Azure Resource Group
- AKS
- Log Analytics Workspace
- KMS, DES and KeyVault for AKS
- CDN profile
- Azure PostgreSQL Flexible Server
- Redis cache
- Azure Storage Accounts (for app and storage)
- Application Gateway (API entry point)
Prerequisites
- Terraform installed on your local machine.
- An Azure subscription with billing enabled.
- Azure CLI installed and authenticated with your Azure account.
Deployment Steps
Clone the Repository
Run:
git clone https://github.com/medplum/medplum
cd terraform/azure/
Configure Backend (Optional)
If you want to use a remote backend to store the Terraform state, uncomment and configure the backend.tf file.
Initialize Terraform
Modify the terraform.tfvars file to enter your project-specific values:
# Azure project configuration - Change these values to use your own project, region, and zone
project_id = "your-project-id"
region     = "your-region"
zone       = "your-zone"

# Common enforced labels - Change these values to use your own labels
labels = {
  env     = "your-environment"  # e.g., "dev", "staging", "prod"
  purpose = "your-purpose"      # e.g., "gke", "web", "database"
  owner   = "your-owner"        # e.g., "team-name", "project-owner"
}

# Azure
resource_group_name = "medplum" 	# Name of the RG to be created
location            = "eastus2"	# Infra region
tags = { 				# Tags that will be applied to all resources
  app = "medplum"
}
app_domain                = "app.azure.medplum.dev"  # CDN Custom domain
app_certificate_secret_id = "https://medplum-certs.vault.azure.net/certificates/medplum-appb0836994-69fff284f95" # The exported Certificate URI (See step 1)
Initialize Terraform
Initialize the Terraform working directory to download the necessary provider plugins and modules:
terraform init
Plan the Deployment
Generate and review an execution plan to ensure the configuration is correct:
terraform plan
Apply the Configuration
Apply the Terraform configuration to create the resources in Azure:
terraform apply
Terraform will output values needed for the next steps
(Some values redacted)
api_ip = "201.429.43.229"
cdn_endpoint = "medplumapp7d8c-endpoint-cv01.azurefd.net"
medplum_server_identity_client_id = "7f61-4b27-ae90d7ee8"
medplum_server_identity_name = "e93eec1b510a2d7f-medplum-server"
oidc_issuer_url = "https://eastus2.oic.prod-aks.azure.com/befe7abf94d5/b7-4516-b42a32/"
postgresql_dns_record = "medplum.postgres.database.azure.com"
redis_hostname = "medplum.redis.cache.windows.net"
postgresql_password = (sensitive value)
Use terraform output postgresql_password to retrieve the PostgreSQL password
Generate configuration secret
The configuration secret holds the Medplum application configuration, and it contains the connection strings to the rest of the infrastructure that we deployed before using terraform.
1. Use an existing or create a new KeyVault in Azure
2. Prepare the Secret Data
Create a JSON file containing your secret data. Save it as secret_data.json.
{
    "port": 8103,
    "baseUrl": "http://localhost:8103/",
    "issuer": "http://localhost:8103/",
    "audience": "http://localhost:8103/",
    "jwksUrl": "http://localhost:8103/.well-known/jwks.json",
    "authorizeUrl": "http://localhost:8103/oauth2/authorize",
    "tokenUrl": "http://localhost:8103/oauth2/token",
    "userInfoUrl": "http://localhost:8103/oauth2/userinfo",
    "appBaseUrl": "http://localhost:3000/",
    "binaryStorage": "file:./binary/",
    "storageBaseUrl": "http://localhost:8103/storage/",
    "supportEmail": "\"Medplum\" <support@medplum.com>",
    "googleClientId": "397236612778-c0b5tnjv98frbo1tfuuha5vkme3cmq4s.apps.googleusercontent.com",
    "googleClientSecret": "",
    "recaptchaSiteKey": "6LfHdsYdAAAAAC0uLnnRrDrhcXnziiUwKd8VtLNq",
    "recaptchaSecretKey": "6LfHdsYdAAAAAH9dN154jbJ3zpQife3xaiTvPChL",
    "adminClientId": "2a4b77f2-4d4e-43c6-9b01-330eb5ca772f",
    "maxJsonSize": "1mb",
    "maxBatchSize": "50mb",
    "botLambdaRoleArn": "",
    "botLambdaLayerName": "medplum-bot-layer",
    "vmContextBotsEnabled": true,
    "defaultBotRuntimeVersion": "vmcontext",
    "allowedOrigins": "*",
    "introspectionEnabled": true,
    "database": {
      "host": "YOUR_DB_HOST",
      "port": 5432,
      "dbname": "medplum",
      "username": "medplumadmin",
      "password": "YOUR_DB_PASSWORD"
    },
    "redis": {
      "host": "YOUR_REDIS_HOST",
      "port": 6380,
      "password": "YOUR_REDIS_PASSWORD",
      "tls": true
    },
    "bullmq": {
      "removeOnFail": { "count": 1 },
      "removeOnComplete": { "count": 1 }
    },
    "shutdownTimeoutMilliseconds": 30000,
    "chainedSearchWithReferenceTables": true
  }
- Replace YOUR_DB_HOST and YOUR_REDIS_HOST with your database's hostnames or IP addresses and Redis instances.
- Ensure the JSON content is correctly formatted and that any variables or placeholders are replaced with actual values.
- See [/docs/self-hosting/presigned-urls] to setup presigned URLs
3. Create a secret in the KeyVault:
Use the az cli to add the secret data to your secret.
az keyvault secret set --vault-name "my-keyvault" --name "medplum-config" --file "secret_data.json"
Configure DNS
After deploying the infrastructure, you need to point your domains to the infrastructure created by Terraform.
- From the terraform output:
Retrieve the external IP address of the Application Gateway, and the CDN endpoint
api_ip = "201.429.43.229"
cdn_endpoint = "medplumapp7d8c-endpoint-cv01.azurefd.net"
- Update DNS Records:
In your DNS provider’s management console, create an A record pointing to the IP address, and a CNAME record pointing to the CDN address: - For
api.medplum.com:- Create an A record for api.medplum.com pointing to
201.429.43.229
- Create an A record for api.medplum.com pointing to
- For
app.medplum.com:- Create a CNAME record for app.medplum.com pointing to
medplumapp-endpoint-cv01.azurefd.net
- Create a CNAME record for app.medplum.com pointing to
Deploy the APP Using Helm
The Helm chart is a package containing yaml templates representing Kubernetes Objects.
The helm chart can be found in the helm directory.
It will deploy:
- Deployment
- Horizontal Pod Autoscaler
- Service
- Ingress with Azure Application Gateway
- The ingress is optional. Users can choose to expose the API with other methods
- Service Account
Deploy your backend API to the AKS cluster using Helm
Configure kubectl
Get credentials for your GKE cluster:
az aks get-credentials --resource-group MY_RESOURCE_GROUP --name AKS_NAME --overwrite-existing --admin
Navigate to Your Helm Chart Directory
cd medplum/helm
Edit the values.yaml File
Edit the values.yaml file to override default values, specifying your cloud provider, project_id and config_sicret_id:
global:
  cloudProvider: azure
  azure:
    keyVaultURL: [MY_KEYVAULT_URL] # Your Azure Key Vault URL
    secretName: [MY_CONFIG_SECRET_NAME] # The configuration secret Name in Azure
Replace [MY_KEYVAULT_URL] with the key vault URL where the configuration secret is.
Replace [MY_CONFIG_SECRET_NAME] with the secret name created in the step before.
Edit service account values
serviceAccount:
  annotations:
    azure.workload.identity/client-id: "MY_AZURE_MANAGED_IDENTITY_ID" # Azure Managed Identity Client ID
Replace [MY_AZURE_MANAGED_IDENTITY_ID] with the managed entity ID from the terraform output:
medplum_server_identity_client_id = "7f61-4b27-ae90d7ee8"
Edit ingress values:
(ingress is optional; customers can choose to use whatever method they like to expose the app)
ingress:
  deploy: true
  domain: [MY_DOMAIN] # Your domain name
  tlsSecretName: [TLS_SECRET_NAME] # Azure only
Replace MY_DOMAIN and TLS_SECRET_NAME with your actual domain and certificate secret name
Create a K8s secret from the KeyVault certificate:
In the Step 1, we prepared a certificate for api.medplum.com and exported it to a KeyVault. Now we need to download that certificate and create a kubernetes secret with it:
# download cert
az keyvault secret show \
    --vault-name $KEYVAULT_NAME \
    --name $CERT_SECRET_NAME \
    --query value -o tsv \
   | base64 -d > mycert.pfx
# export public certificate
openssl pkcs12 -in mycert.pfx -clcerts -nokeys -out mycert.crt -passin pass:

# export private key
openssl pkcs12 -in mycert.pfx -nocerts -nodes -out mycert.key -passin pass:

# Create the secret in the cluster
kubectl create secret tls api-certificate \
  --namespace medplum \
  --cert=mycert.crt \
  --key=mycert.key
Replace the variables. (this will create a secret called api-certificate in namespace medplum)
Install the Application:
helm install medplum-server . -n medplum --create-namespace -f values.yaml
Note: "." is the ./path-to-your-helm-chart. The values.yaml is in the same directory as helm chart
Deploy the frontend (App)
Serve your frontend application through Cloud Storage and the CDN-enabled load balancer.
- Upload to CDN storage account:
Use thedeploy-app-azure.shto deploy the frontend static contents to the CDN storage account Important: ensure that you have built the APP code with the proper API domain.
Clean Up Resources (Optional)
If you need to tear down the infrastructure, use:
terraform destroy
Note: This will destroy all resources created by Terraform, including the AKS cluster and static IP addresses
Notes
For any issues or questions, please refer to the Terraform documentation or the Azure documentation.